

Policy and Enforcement
Policy is what makes the proxy more than a mirror. Every install that passes through ShieldedStack is checked against the policy of the workspace the API key belongs to, and the result is recorded with the reason it was reached.
This page explains what each control does, the order the checks run in, and how to combine them into a posture that fits an environment.
Policy is configured per workspace under Settings and Settings -> Package Filters. A workspace admin, or a member with the Manage configuration and Manage package policy permissions, can change it.
How a Request Is Decided
Section titled “How a Request Is Decided”The checks run in a fixed order, and the first one that reaches a verdict wins. An allow-list match permits the install immediately, regardless of vulnerabilities, licenses, release age, or deny rules, so an explicit allow is the strongest statement you can make about a package. Required allow-list membership is checked next, then the deny list. A missing fact never bypasses a known blocking condition.
Workspace configuration and filter lookups are cached for five minutes. Allow up to five minutes for changes to reach every proxy instance. Filter expiry is checked during requests, so an expired rule does not remain active until the cache refreshes.
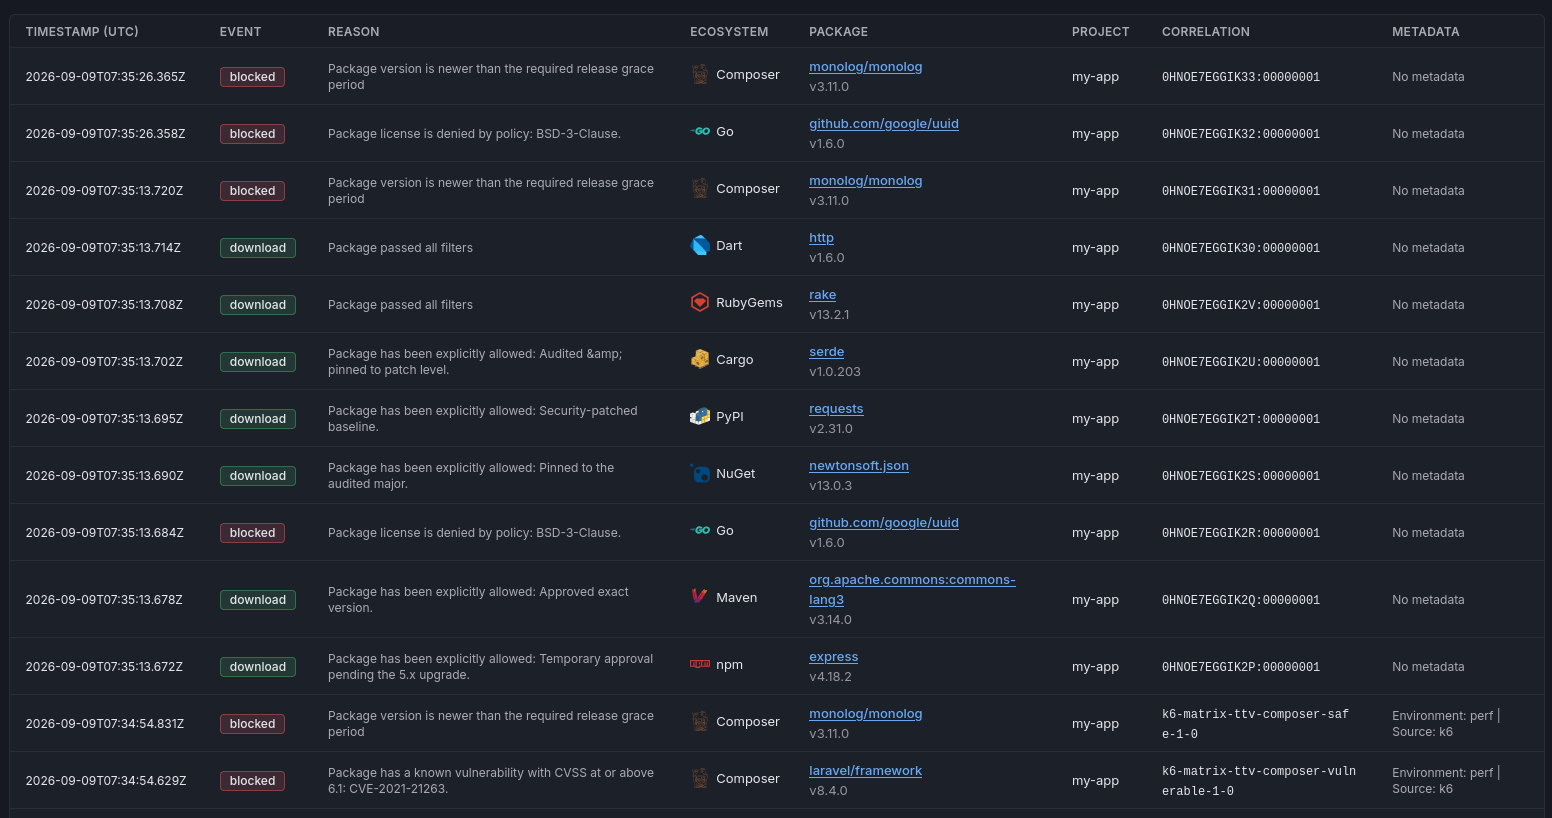
Whatever the outcome, the decision and its reason are written to the request log, so a block is never silent and an allow is never unexplained. See Request Logs for how to read them back.
Package Filter Settings
Section titled “Package Filter Settings”These live on the Settings page and govern how the allow and deny lists behave.
| Setting | Effect |
|---|---|
| Enable Allowlist | Turns on allow-list matching. A package matching an allow rule is permitted even when it would otherwise be blocked. |
| Require Allowlist Match in every ecosystem | Available once the allow list is enabled. Blocks everything that is not on the allow list, regardless of vulnerability status. This turns the workspace into a closed catalogue, including ecosystems added in future releases. |
| Require Allowlist Match in selected ecosystems | The same closed catalogue, for only the ecosystems you tick. For example, require container images to be on the allow list while npm and NuGet packages keep following normal policy. Your selection is remembered while the every-ecosystem setting is on. |
| Enable Denylist | Turns on deny-list matching. A package matching a deny rule is blocked. Turning this off does not disable the workspace vulnerability, license, or release-age policies. |
An allow list that is enabled without Require Allowlist Match is an exemption list: it lets specific packages through checks they would otherwise fail, and everything else follows normal policy. With Require Allowlist Match enabled it becomes the definition of what exists. Turn it on only after the allow list genuinely covers every dependency the workspace builds with, including transitive ones, or builds will start failing on packages nobody thought to list. Requiring it one ecosystem at a time lets you close each catalogue as its allow list becomes complete.
Security Settings
Section titled “Security Settings”| Setting | Effect |
|---|---|
| Minimum Package Block Level | The severity at which a known vulnerability blocks the install. A package whose highest known severity reaches this level is blocked. Active vulnerability exceptions are excluded from that calculation. |
| Vulnerability threshold | Select Severity (the default) or CVSS. |
| Block at CVSS | In CVSS mode, block an unaccepted advisory whose score is greater than or equal to this value, from 0 to 10. A threshold of 8.5 permits 8.4 but blocks 8.5. |
| Severity fallback for missing CVSS | In CVSS mode, use this severity threshold only for advisories without a valid score. A scored advisory is judged by CVSS, not by both thresholds. |
| Denied SPDX licenses | Search by SPDX ID or full name, or select an identifier family such as BSD or BSD-3. Deny matching selects all visible matches; Clear matching removes them. Individual toggles remain available. Selected only shows the current deny list. No selected licenses means no license blocking. |
| Running Mode | How ShieldedStack treats a package it has no current assessment for. See below. |
| Package Release Grace Period (days) | Blocks versions that have been published for fewer than this many days. Set it to 0 to disable the check. |
| Trusted Publishers | The container image publishers whose signed SBOMs this workspace accepts as a description of what an image contains. Docker Hardened Images and Chainguard are both trusted by default. An image whose SBOM is signed only by a publisher not selected here counts as having no signed SBOM, and is blocked in either running mode unless an allow rule admits it. See Container Images. |
Running Mode
Section titled “Running Mode”When license restrictions apply and the license is missing or cannot be interpreted, Trust then Verify permits the install pending collection. Verify then Trust retrieves metadata and blocks if the license remains unresolved. A known denied license blocks in either mode. License metadata is cached per exact package version; advisory-only refreshes preserve it.
ShieldedStack always applies your explicit filters and everything it already knows about a package. The running mode decides only what happens when current assessment facts are not available for the exact version being requested.
- Trust then Verify allows the install and continues the assessment behind it. Findings show up as alerts shortly afterwards. Installs are never delayed by an assessment, and a first-seen version can reach a build before it has been judged.
- Verify then Trust requires a current assessment before allowing the version. If one is not already available, ShieldedStack obtains it as part of the request. If it cannot, the request is blocked rather than allowed on trust.
Most rollouts start in Trust then Verify for long enough to build a clean inventory and tune filters against real traffic, then move higher-risk workspaces to Verify then Trust. Because that mode can block on a failure to verify, it depends on the deployment being able to reach its configured advisory sources.
Grace Period
Section titled “Grace Period”A release grace period is the cheapest defence against a compromised or typosquatted release, because most malicious versions are found and pulled within days of publication. A value between 3 and 14 days is a common starting point.
It applies to the version, not the package: an established dependency publishing a new patch is subject to the same wait. Teams that need a specific new version before it ages out add a targeted allow-list rule for that version rather than lowering the setting for the whole workspace.
Container Images
Section titled “Container Images”A container image is decided like a package. Its name and digest are the package and version, so allow and deny rules with the OCI ecosystem apply to it, and a vulnerability threshold blocks it when a package inside it reaches the threshold. License policy and the release grace period do not apply to images.
ShieldedStack learns what an image contains from the SBOM its publisher signs and attaches to it, and only from publishers listed under Trusted Publishers. The proxy checks the signature during the first pull of each image, so an image without such an SBOM is blocked in either running mode, from its first pull. The running mode decides only what happens while the packages inside a signed image are matched against known vulnerabilities:
- Trust then Verify allows the image straight away and matches its packages in the background, as it does for packages.
- Verify then Trust refuses the first pull with a request to retry in about a minute, and decides the image once the matching completes.
If the registry cannot be reached to check the signature, Trust then Verify allows the pull and Verify then Trust asks for a retry. Neither treats an unreachable registry as a missing SBOM.
An allow rule with the OCI ecosystem admits an image whatever its SBOM, which is how images from other publishers are used. See Allowing unattested images and Container images for configuring the runtimes.
Package Filters
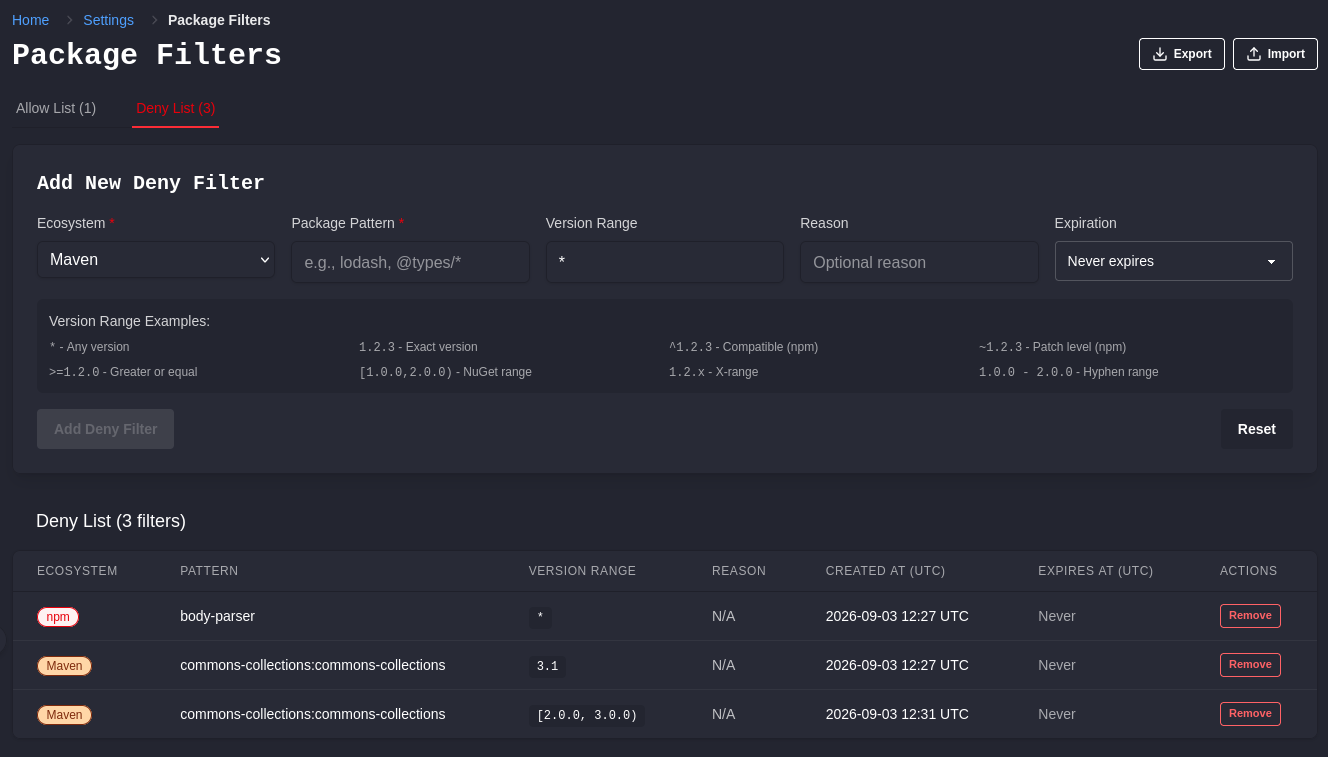
Section titled “Package Filters”Settings -> Package Filters holds the rules themselves. Each rule is an allow or deny entry made of an ecosystem, a package pattern, an optional version range, an optional reason, and an optional expiry.
Both lists are shown in one table, with an Action column marking each rule as ALLOW or DENY. Search matches on pattern, version range and reason, and the Action, Ecosystem and Status filters narrow the table further, so a question like “is this package covered anywhere?” is one search rather than a walk through two separate lists.
A banner above the table states which lists are currently switched on and restates that allow rules win. This matters because the switches are independent of the rules: a list can hold rules while being switched off, which is what lets you write or import a ruleset, review it in the table, and turn enforcement on only once it reads the way you intended. Until then the rules are visible but inert, and the banner is what tells you so.
Checking a Package
Section titled “Checking a Package”Check a package takes an ecosystem, a package name and an optional version, and reports which rule decides it and why. It reads the lists exactly the way a real request does, so it accounts for allow winning over deny and for exact patterns beating wildcards. It changes nothing, downloads nothing, and records nothing.
Use it before removing a rule you are unsure about, and after adding one, to confirm the rule you just wrote is the one that actually wins.
Within each list, eligible exact matches are checked first. Wildcards are then checked by descending count of non-* characters: microsoft/lodash* before microsoft/*, and the global * last. Ties use fewer wildcards, then pattern and version-range text; creation time and rule ID do not set precedence. Rules must still match the ecosystem and version and must not be expired, so an ineligible narrower rule falls through to a broader match. This ordering selects the reported rule within a list; it does not change allow-over-deny precedence. A matching broad allow still wins over a specific deny.
The check covers the allow and deny lists only. A result of “no rule matched” means these lists do not decide the package, not that it is allowed: it still faces the vulnerability, license, grace-period and running-mode checks above. When nothing matches, the checker also shows the workspace policy the package will then be judged against. That is a preview of the settings, not an assessment: it fetches no package facts and records nothing.
License Expressions
Section titled “License Expressions”The deny list contains exact SPDX license identifiers, not expression strings or license-family wildcards. Family selection is a bulk-edit shortcut over the current catalog: selecting BSD does not automatically deny identifiers added to the catalog later. Families group identifier prefixes, not legal equivalence. GPL-3.0-only and GPL-3.0-or-later are distinct entries. If GPL-3.0-only is denied:
| Package license | Result |
|---|---|
MIT OR GPL-3.0-only |
Permitted: MIT is an available alternative. |
MIT AND GPL-3.0-only |
Denied: both components are required. |
(MIT OR GPL-3.0-only) AND Apache-2.0 |
Permitted if Apache-2.0 is also permitted. |
GPL-3.0-only WITH Classpath-exception-2.0 |
Denied: the exception does not override a denied base license. |
Deprecated SPDX identifiers are matched against their current spelling, so denying GPL-3.0-only also blocks a package that declares the older GPL-3.0, and denying GPL-2.0-or-later blocks one declaring GPL-2.0+. Registries are still full of the pre-2017 spellings, so the two are treated as the same license rather than as separate entries.
Unrecognized license text is unresolved evidence, not automatically a permitted license. Its treatment follows the running mode above.
EPSS remains available for existing advisory information and risk scoring but does not affect install decisions. Policy evaluation retains advisory identity so future EPSS conditions can use scores from the same advisory. EPSS enforcement will require its own freshness, enrichment, and missing-data rules before being enabled, particularly for Verify then Trust.
Package Patterns
Section titled “Package Patterns”Patterns are simple glob-style matches on the package name:
| Pattern | Matches |
|---|---|
lodash |
Exactly that package |
@scope/* |
Every package under a scope |
com.example.* |
Every package under a group or namespace prefix |
* |
Every package in the ecosystem |
A catch-all * has to be confirmed explicitly, because on a deny list it blocks the entire ecosystem and on an allow list it silently disables the protection the allow list exists to provide.
Package Names
Section titled “Package Names”Allow rules and vulnerability exceptions compare names the way the package’s registry does. Where the registry treats two spellings as one package, either spelling matches the rule. Where it treats them as different packages, an allow or exception applies only to the spelling you wrote. Deny rules are deliberately broader: exact and wildcard deny patterns ignore case in every ecosystem, so a deny rule for Example/Widget also blocks example/widget, even where those names could identify different packages. This avoids silently missing a block because of casing; use an allow or exception only for the specific identity you intend to exempt.
The table describes how patterns are saved and compared for allow rules and exceptions. Deny matching uses these same registry equivalences, then also ignores case. This does not make all package names case-insensitive in storage.
| Ecosystem | Allow/exception case | Separators | Pattern saved as |
|---|---|---|---|
| PyPI | Ignored | Any run of -, _ and . is one - |
Flask_Cors saves as flask-cors |
| Cargo | Ignored | - and _ are the same character |
Serde_Json saves as serde-json |
| NuGet | Ignored | Exact | Newtonsoft.Json saves as newtonsoft.json |
| Composer | Ignored | Exact | Monolog/Monolog saves as monolog/monolog |
| npm | Exact | Exact | JSONStream saves as written |
| Maven | Exact | Exact | com.google.guava:guava saves as written |
| Go | Exact | Exact | github.com/sirupsen/logrus saves as written |
| RubyGems | Exact | Exact | net-http saves as written |
| Dart | Exact | Exact | shared_preferences saves as written |
| Hex | Exact | Exact | phoenix_html saves as written |
| Container images | Exact | Exact | docker.io/library/nginx saves as written. Docker Hub’s official images are in the library namespace, and a name without a namespace is refused. See Image names in rules |
A rule is shown in the form it is saved, and wildcards follow the same registry equivalence rules: a PyPI filter on flask_* matches Flask-Cors. The extra case-insensitive deny matching does not change how rule patterns are saved, removed, or deduplicated on import. For example, a file that lists PyPI Flask_Cors and flask-cors still contains the same filter twice, while case-distinct npm patterns remain distinct saved rules. Vulnerability exceptions do not acquire deny matching’s broader case behavior.
Allow rules are evaluated before deny rules. If a broad deny and a matching allow both cover an install, the allow wins. Check both spellings with Check a package before relying on a case-specific exception or a broad deny rule.
Version Ranges
Section titled “Version Ranges”Use * to apply a rule to every version. To scope it, use the range syntax you already know from npm and NuGet:
| Range | Meaning |
|---|---|
* |
Every version |
1.2.3 |
That version exactly |
>=2.0.0, <3.0.0 |
Comparison operators |
>=2.0.0 <3.0.0 |
Two comparators combine into one window |
^4.17.0 |
Compatible releases within the same major version |
~1.2.3 |
Patch-level releases within the same minor version |
1.2.x, 1.x.x, 1.2.3.x |
Wildcards. Trailing x segments widen the last number given, so four-part NuGet versions and longer Maven, PyPI and RubyGems versions work the same way |
[1.0.0,2.0.0) |
NuGet bracket notation, inclusive and exclusive bounds |
Whichever notation you type, a saved rule is displayed using comparators. A rule entered as ^1.2.3 reads back as >=1.2.3 <2.0.0, and one entered as [1.0.0,2.0.0) reads back as >=1.0.0 <2.0.0. The set of versions matched does not change, and the displayed form is itself valid input, so a range copied out of the table can be pasted straight back in.
Versions are compared the way their own ecosystem orders them, not as text. A prerelease sorts before its release, so 2.0.0-rc.1 falls inside <2.0.0, as do a Maven 2.0-SNAPSHOT, a RubyGems 2.0.0.pre and a PyPI 2.0rc1. PyPI epochs such as 1!2.0.0, Maven qualifiers such as -M1, -RC1 and .Final, and Go module versions with their leading v, pseudo-versions included, are all placed by their ecosystem’s rules. An exact version in brackets, such as [1!2.0.0], matches that version in every ecosystem, and any other single version you enter, such as 1.0 or 1.0.0-SNAPSHOT, matches that version exactly, never as a minimum.
Occasionally a requested version cannot be placed against a range at all, such as a branch name where a release number is expected. A deny rule treats that version as covered and blocks it; an allow rule does not treat it as covered. Each direction errs toward blocking, the same way deny rules match names in any casing.
One thing comparators cannot express here is an either/or: ^1.0.0 || ^2.0.0 is not supported, because a rule matches a single contiguous window. Write it as two rules.
Container images have no version order: an OCI rule’s version is * or one full platform digest, sha256: followed by 64 hexadecimal characters. For a multi-platform image that is not the digest docker pull prints; see Platform digests. Shortened digests are not accepted.
Reasons and Expiry
Section titled “Reasons and Expiry”A reason is optional and worth writing anyway. Filters outlive the incident that prompted them, and a rule nobody can explain is a rule nobody dares remove.
An expiry turns a rule into a temporary measure that cleans itself up. Use one for a deny rule covering an advisory you expect to be patched, or for an allow rule waiving a control while a migration is in flight. Expired filters stop applying and are left out of exports.
Expired rules are still listed, dimmed, so they can be reviewed rather than quietly vanishing. The Status filter separates active rules from those expiring within 30 days and those already expired, and the table notes how many have expired. To clear them out, filter to Expired, select the rows and remove them together.
Removing Rules in Bulk
Section titled “Removing Rules in Bulk”Selecting rows and choosing Remove selected deletes them in a single operation. This matters for a list that has grown: the alternative is one confirmation per rule. If some of the selected rules were already deleted elsewhere, the rest are still removed and the result says how many were already gone.
Importing and Exporting Filters
Section titled “Importing and Exporting Filters”Export writes a workspace’s allow and deny lists to a JSON file; import applies such a file to any workspace you administer. Teams use this to keep policy under version control and review it in pull requests, to promote a reviewed policy from staging to production, to seed a new workspace without retyping every rule, and to keep a restorable copy of a curated list.
Import offers three modes:
- Merge adds the filters that are missing and refreshes the reason and expiry of the ones already present. It never deletes anything.
- Replace treats the file as the complete list, so filters not in it are deleted. Only the lists actually present in the file are touched, and a file containing just an allow list leaves the deny list alone.
- Validate runs the import without changing anything and reports every problem it finds, each pointing at the entry that caused it.
Imports are all-or-nothing: if one entry is rejected, nothing is applied. Validating first is the reliable way to work through a hand-edited file.
A few things worth knowing about the files:
- They carry only the policy itself: ecosystem, pattern, version range, reason, and expiry. Workspace defaults are not included. Who created a filter and when is recorded fresh in the receiving workspace, so an imported file cannot rewrite your audit trail.
- Catch-all patterns are refused unless you confirm them, for the reasons above.
- Already-expired filters are left out of exports, since importing one has no effect.
- Importing requires workspace admin rights. Exporting is available to any workspace member.
Vulnerability exceptions are never included in either direction. An exception records a decision that a named advisory is acceptable for a named version in one environment, and carrying that decision into another environment would move a risk acceptance somewhere nobody reviewed it.
Vulnerability Exceptions
Section titled “Vulnerability Exceptions”An exception excludes one advisory on one exact package version from vulnerability policy, including severity, CVSS, and severity fallback, and stops generating new alerts for it. License and release-age policies continue to apply normally.
Deployment Compatibility
Section titled “Deployment Compatibility”Existing workspaces keep severity mode, their current block level and grace period, and no license restrictions, so policy does not change until you change it. Apply the additive migration and deploy the updated portal, worker, and every proxy before switching a workspace to CVSS mode or adding denied licenses. Before rolling back, restore severity mode with an empty license list and allow caches to refresh. The assessment cache uses a new payload key version, so older entries are refreshed rather than mistaken for complete CVSS or license evidence.
Exceptions are the release valve that keeps the block level honest. Without them, one unfixable advisory in a pinned dependency pushes teams toward lowering the block level for the whole workspace, which is a far larger concession than the one they actually wanted to make.
Add one from an alert, from a package’s Security tab, or from the CVEs page. Review and revoke them under Settings -> Vulnerability Exceptions, which keeps a record of who added each and when. See Alerts and Triage for the workflow.
Choosing a Posture
Section titled “Choosing a Posture”| Environment | A reasonable starting point |
|---|---|
| Development, first rollout | Trust then Verify, deny list on, block level High, no grace period. Build an inventory and see real traffic before enforcing. |
| Shared build agents | Trust then Verify, deny list on, block level High, grace period of 7 days. |
| Production, release pipelines | Verify then Trust, deny list on, block level Medium or High, grace period of 7 to 14 days. |
| Regulated or air-gapped | Verify then Trust with Require Allowlist Match, once the allow list is complete and maintained. |
Use separate workspaces when environments need different answers here. Policy, filters, exceptions, alerts, and history are all scoped to the workspace, so one environment tightening its posture never disturbs another.